Hello and welcome to my Tiger Face Paint Step by Step Guide
I will be showing you from start to finish how you can paint a simple Tiger face.
This face is one of the popular faces asked for at parties and events.
What you will need
- Facepainting Sponges
- Major Brushes (Round)
- White Facepaint (Snazaroo)
- Yellow Facepaint ( Snazaroo)
- Orange Facepaint (Snazaroo)
- Black Facepaint (Snazaroo)
- Red Facepaint (Snazaroo)
- Glitter
- Spritzer
- Water
I bought all of my materials from this site: http://www.facepaintsdirect.co.uk/
Step 1
Fill up a container with a small amount of water, this will be used to clean your brushes and wet you brushes
Step 2
 Fill up you spritzer with water as well, this will be sprayed onto the paint when you are using your sponge
Step 3
Spray the spritzer on the white paint, rub your sponge into it to pick up the paint then paint a white beard. Try to get an even coverage by wiping the the sponge over the face dabbing where skin can be seen.
 Step 4:Paint two large shapes above the eyes in white. Ensure they look the same on each eye.

Step 5
With the white paint, create a mustache under the nose for the muzzle of the tiger. Also paint a white line along the bottom of the eye.
 Step 6 With a sponge paint all around the white bits with yellow. Be sure not to go over the white parts. Dab your brush to get better coverage.
 With your sponge, paint the edges of the yellow orange. Don't go over the white bits and don't paint too far into the yellow.
 Step 8:Once you have painted the orange around the yellow blend the orange into the center. You can do this by either getting a dry sponge with a small amount of orange paint and dragging it from the center into the middle or by painting orange far into the center and then dabbing yellow onto the orange that is too far in.

Step 9
Gather some red paint on a sponge and go around the edge of the orange.
 Step 10:Repeat the blending technique described in step 8
 With a round brush and black paint create a triangle shape on the nose
 Step 12: Create a line from the nose to the top lip using a round brush and black paint. Paint the top lip black.
 Create two large curved lines that come from the top lip and curve in towards the nose. This will be the muzzle of the tiger. Paint a triangle in the middle of the lips with the line from the nose being in the center
 Step 14: Paint the bottom lip black and add hairs to the side of the moth This can be done by flicking the brush from the lip outwards. I would not recommend painting the bottom lip black as I have found that children will more than likely wipe it off and leave a mess. Instead you can use watered down red or orange for the bottom lip.
Step 15
 One the eyes create a cat eye effect with your brush. To do this start a line from the inside of your eye and create a line that follows the shape of your eye and flicks out pass the end of the eyelid. Create a black line underneath the eye that connects to the flick.
 Step 16: Colour in the eyelid in black and do the same to the other eye.
 Create fur on the chin and around the jaw by flicking the paint brush from the chin and into the center
 Step 18: Create whiskers on the muzzle by making a series of dots that start from the the top and angle towards the lips. Try to make the dots go from bigger to smaller. you can add lines from fur whiskers if you want.
 Now its time to add the stripes. To create a stripe start with the tip of the brush touching the skin. As you create a line, place the bush flat in the middle of the line. Slowly twist the brush off of the skin. The stripe should be 'skinny, fat, skinny' Don't worry if you can't get it the first time it takes a lot of practice.
 Step 20
Stripes can be in any order and shape you want them to be in
 Step 21: You can also add spots in between stripes if you want to.
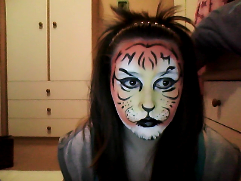
 Step 22:As you can see its just a case of building up stripes in order to get a tiger face paint that looks detailed. If you break the stripes up then it will be a lot easier
 While this tiger face is okay for older children, teens and adults you may want to only do a few stripes on small children as they tend to wiggle a lot and some can find it hard to sit still of a long period of time
 I hope this step by step guide was useful. It you did then post a picture of your facepaint or leave a comment below ^_^
Step 4:Paint two large shapes above the eyes in white. Ensure they look the same on each eye.Step 5
With the white paint, create a mustache under the nose for the muzzle of the tiger. Also paint a white line along the bottom of the eye.
Step 6 With a sponge paint all around the white bits with yellow. Be sure not to go over the white parts. Dab your brush to get better coverage.
Step 7
With your sponge, paint the edges of the yellow orange. Don't go over the white bits and don't paint too far into the yellow.Step 8:Once you have painted the orange around the yellow blend the orange into the center. You can do this by either getting a dry sponge with a small amount of orange paint and dragging it from the center into the middle or by painting orange far into the center and then dabbing yellow onto the orange that is too far in.Gather some red paint on a sponge and go around the edge of the orange.
Step 10:Repeat the blending technique described in step 8
Step 11
With a round brush and black paint create a triangle shape on the noseStep 12: Create a line from the nose to the top lip using a round brush and black paint. Paint the top lip black.
Step 13
Create two large curved lines that come from the top lip and curve in towards the nose. This will be the muzzle of the tiger. Paint a triangle in the middle of the lips with the line from the nose being in the center Step 14: Paint the bottom lip black and add hairs to the side of the moth This can be done by flicking the brush from the lip outwards. I would not recommend painting the bottom lip black as I have found that children will more than likely wipe it off and leave a mess. Instead you can use watered down red or orange for the bottom lip.Step 15
One the eyes create a cat eye effect with your brush. To do this start a line from the inside of your eye and create a line that follows the shape of your eye and flicks out pass the end of the eyelid. Create a black line underneath the eye that connects to the flick.Step 16: Colour in the eyelid in black and do the same to the other eye.
Step 17
Create fur on the chin and around the jaw by flicking the paint brush from the chin and into the center Step 18: Create whiskers on the muzzle by making a series of dots that start from the the top and angle towards the lips. Try to make the dots go from bigger to smaller. you can add lines from fur whiskers if you want.
Step 19
Now its time to add the stripes. To create a stripe start with the tip of the brush touching the skin. As you create a line, place the bush flat in the middle of the line. Slowly twist the brush off of the skin. The stripe should be 'skinny, fat, skinny' Don't worry if you can't get it the first time it takes a lot of practice. Step 20Stripes can be in any order and shape you want them to be in
Step 21: You can also add spots in between stripes if you want to. Step 22:As you can see its just a case of building up stripes in order to get a tiger face paint that looks detailed. If you break the stripes up then it will be a lot easier
Step 23
While this tiger face is okay for older children, teens and adults you may want to only do a few stripes on small children as they tend to wiggle a lot and some can find it hard to sit still of a long period of time
If you want to see a video tutorial of how I paint this face click here-> https://www.youtube.com/watch?v=jSBY71MpSts


.JPG)


.JPG)


.JPG)


